Posts tonen met het label DIY. Alle posts tonen

Christmas DIY Advent Calendar

Hello everyone! Today I’m going to show you a quick and easy (but also really cute) DIY. We’re going to make an advent calendar to count down to Christmas. I’ve used stuff everyone has at home, so that won’t be a problem. I guess everyone is looking forward to Christmas, so this must be a fun DIY for everyone. It will never be as great as the original advent calendars, but it will look more beautiful and cute. You don’t have to stick to the steps I take. You can also use other things, this is just a setup. I hope you like it and let’s start.

DIY Easter Jars

As soon as the flowers grow I thought about Easter coming up. I'm so excited because all the flowers are popping up, the sun is shining and of course; lot's of chocolate is on it's way! I really wanted  to have something Easter themed in my room, but when I went to the shops everything was very expensive. That's why I decided to come up with my own, cheap and especially easy Easter tutorial. We are going to make some nice Easter jars! Click read more to see the full photo tutorial.

DIY Valentines Day Gift Ideas!


Hi! First of all, I would like to tell you that our mission succeeded! I am the look of the month in the Cosmogirl magazine! I'm so happy and I love you so much for supporting me and voting for me. You are the best, thanks!

I tried to upload the video I'm showing you right now yesterday, but I failed because the image kept being black. Really weird, but I hope you still would like to see it because I have put a lot of effort in making this video. I am showing you a few (DIY) valentines day gift ideas. You can use them for your friends and some are appropriate for your boyfriend. I thought about these ideas myself so if you want an original idea, go for these! Enjoy en let me know in the comments which idea you like the best.

How to make your own scented scrub soap? + GIVE AWAY!!

Hi! Today I have another DIY video for you. I'm showing you how you can make your very own soap. It's not just a soap, but a scented scrub soap. It will make your hands really soft and they will smell amazing afterwards! Just to inform you, you can get a package with all the things you need for this tutorial here. It's very handy and you are sure you have everything! Also I will be giving away a few things so click the read more button!

What to do when you are bored?

Sometimes all your friends seem to have an appointment, your family is gone and you can't find any homework on your desk. What should you do? In this post I will give you a few tips on things you can do when you are bored! I hope you enjoy :)


PINK ANCHOR NAILS || NAIL ART


Today I will have something different from usual. Laura has written this post for you because she really wanted to write something for my blog. I gave her the chance and I am very happy with the result! She will teach you how to make these cute Pink Anchor nails. It’s perfect for summer and the pink gives a cute vibe to the nails.

Holiday DIY || Earring Hanger

The comming weeks I will be very busy with school because I have a week full of exams right before the holiday. You might want to ask why I consider myself lucky while I have an exam week before the holiday, but that is because otherways I would have it right after the holiday. That would mean that I had to learn, study and learn in the holiday, no, not for me! I would prefer blogging and talking to you guys a lot more :) Today I will post a holiday DIY you can do in the holiday, weekend or just when you come home from school. It costs a little of time, but than you have something very unique: it's a guarantee! I will show you how to make this stylish earring hanger. I hope you guys like it! If you tried this yourself, please mail (blogfashionanna@gmail.com) or tweet (@blogfashionanna) me because I would love to know what you guys make!

Decorated glasses || DIY

Like you have already noticed my header changed to the fashionanna header. This means I am going to change from www.movieanne.com to www.fashionanna.com in a very short period of time! Probably this weekend. Please remeber to find my blog! I am so excited about this new name, I hope you are too :)

Today I have a special DIY for you. I have seen many sunnies with cute little things on them, but I never tried to make one myself. I thought it would be nice to try this to my old 3D glasses from the cinema. We watched a movie in 3D and we were allowed to bring the glasses home so I did. I broke the glasses out of these glasses like a year ago to make a movie about a nerd. It's very easy to make and I think you will like this little DIY! Plus points: you can NOT fail and you can use it for Halloween!


Smileys || Nail art

 I found something like this on youtube and I wanted to try it myself. I think this nail art is just sooo cute! I love it! That's why I made a little how to for you. I hope you like it!

DIY || Vintage Polaroids

 
Do you guys love the vintage effect on photos and these old-looking polaroids? Than this is your DIY. Click read more to see how to do it. 
 

Inspiration

Tumblr_m9f4g0ebef1qhv6sjo1_500_large 

Today I have some inspiration pictures which inspire me in different ways: things I like, things I want to have, inpiration for things I can make/do myself and things I like to share with you. I hope you enjoy!

DIY skull shirt || Outfit

Today I wear something new. I found a very nice DIY on youtube. I think THIS is a good video showing how to do this DIY. It's very simple and a good way to recycle a shirt you don't wear anymore :-)

What do you need?
- A pair of scissors
- A pencil to mark where you are going to cut.
- A (black) shirt.

How to do it?
Mark the face of the skull on your shirt.
Cut it out.
Wear it.

Result:

Click on read more to see!


Dip dye your hair || DIY

I really love this dip dyed hair trend. As I mentioned in previous posts I love colors, so do I love this dip dye your hair trend.

What is it? Dip dyed hair is coloring the lower part of your hair in another color than your natural 'upper' hair. In this time the lower part of the hair is often coloured in a not-nature like color like pink, green, yellow or blue. Maybe you are a little bit frightened of this trend in the beginning, but when you are finished you will love it. As long as you make sure you first make your hair a very light color, everything will be okay.   

 I looked up how to do this yourself. I found how to do it on http://ellegirl.elle.com/ This trend is btw spotted on the catwalk. If you want to know how to dip dye your hair and if you want to see some Prada fashion show pictures of dip dyed hair, click on read more.

A radom post...

Hello!
I've got sooo many things to tell you, I can't wait!
About, fashion, bff, my deo, new shoes, everything!

Let's start with my new shoes for the winter:


A new bracelet I bought myself

My BFF went to london and she bought me a bracelet. How lovely!? THANKS!!

A few years ago, I was addicted on buying new perfume deo......
I made a page in my stylebook about the beach!!
British flag nail art

British flag nail art.

British flag nail art.
I did some nail art just to try it out about the british flag and it turned out pretty well..
do you want to make it yourself? Here is a picture of the things you need in order of using:
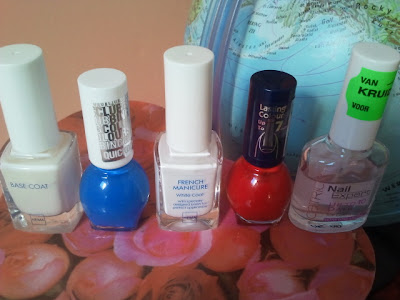
Base coat, dark blue, white, red, transparant top coat. You also need a skewer.
1. Give all your nails a base coat. Let it dry.
2. Make all your nails blue, do this two times if you want it to stay longer.
3. Draw with the white polish a cross on your nails (not too skinny)
4. Draw a thinner cross right through the other cross. And let it dry. (You can use a skewer for that).
5. Color in the white on your nails and leave a thin line behind (from white polish). Let it dry.
6. Use a transparant top coat as a finishing touch!

Now I've got another nail art for you guys! This is the flag from the United States!


You'll need the same as with the British flag, but it has a different order.
1. Give all your nails a basecoat. And let it dry.
2. You can choose to give all your nails the US flag, or just a few. If you choose for a few you color the other nails red or blue. Then you give it a transparant top coat. For the US flag go to the next step.
3. Make with the blue polish a rectangle in the left corner of your nail.
4. With the skewer you can easily make the horizontal stripes on the red part.
5. You can use your skewer again to make some small dots in the blue part of your nail.
6. Now it's time for the transparant top coat for the finishing touch!

Good luck!!


Create your own bracelet!

I found a site where you can create your own bracelet! It's free to make, but when you want to buy it it becomes a veryveryvery expensive unfortunatly. The one I created was 771 euro's!!!!! Do you want to make one yourself? Click here. Ofcourse, you can also choose to do 3 pendants on the bracelet. Then you can ask for your birthday some pendants and your bracelet is full in notime!

I created this one.
